Ingredients
- 3 lbs. bones (choose a variety; frozen bones are OK)
- 1 tsp. sea salt
- 1 Tbsp. apple cider vinegar
- 1/2 medium onion
- 1 small clove garlic
- 3-inch piece of celery
- 3-inch piece of carrot
Instructions
- If your Instant Pot is new, wash it well prior to use.
- Place all of the ingredients in the Instant Pot, and add water to 1-3 inches below the “Max” line. (Less water makes a more gelatinous broth.)
- Be sure the gasket/sealing ring is in place on the cover. Lock the cover in place on the pot. Turn the pressure knob to the “Sealing” position (the knob will stay loose, but it does need to point in the right direction).
- Press the manual button once. You’ll see the display light up to indicate high pressure 30 minutes. Press the + button until it reaches 120. Wait 5 seconds, and the pot will beep and the display will say ON. This means it’s heating up and building up pressure, which takes about 30 minutes. Once full pressure is reached, the display will switch and start counting down from 120. Update: If you bought your Instant Pot in 2018 or later, they updated their display panel. The “manual” button is now called “pressure cook” – this is the button you’ll press.
- When the broth is done, the Instant Pot will beep and the display will switch to L0:00. This is the default “keep warm” setting, and the clock lets you know how long it’s been kept warm (up to 10 hours).
- At this point, you can let it naturally depressurize by leaving it alone for about another hour. Or you can quick-release the pressure, by turning the pressure knob to the “Venting” position. Be careful – when you do this, hot steam is going to come out of that knob. Just be sure to keep your hands and body clear, and turn the knob just slightly at first. As more pressure is released, you can turn it completely into the venting position, and you’ll feel the knob lift up. Once all the steam is released, you can open the pot. A safety measure on the pot is that the lid is pretty much impossible to turn, when it’s still under pressure.
- Use a slotted spoon to remove the bones, meat and vegetables. Throw away the meat and vegetables, but you can freeze the leftover bones and re-use them in your next batch of bone broth. Just be sure you always add at least some new meaty/gelatinous bones to each batch.
- Pour the broth through a mesh strainer into a large bowl. I usually let it sit for 15 minutes or so, so any particles in the broth sink to the bottom of the bowl. I then transfer the broth into mason jars and pour out the last cup (with the particles). Those particles aren’t harmful; they’re just parts of the meat and bones that the strainer didn’t catch. I just like a “prettier” clear broth.
- Let mason jars cool for one hour on the counter, and then refrigerate. If there’s a solid layer of fat on top of the jars, they work like a protective seal, and you can keep the broth in the fridge for weeks. However, if you only have a thin layer of fat, or the fat is cracked, keep the broth in the fridge a maximum of 5 days. You can also freeze broth for up to 6 months. Just let it cool completely in the fridge; then transfer to freezer-safe containers. Most mason jars will crack in the freezer, unless they have completely straight sides. The biggest straight-sided jars I’ve found are 24 ounces. I use those when planning to freeze broth.
Notes
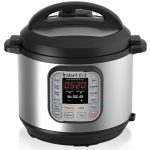
- This recipe was written for the 7-in-1 6-Quart Instant Pot (the most popular model). Generally speaking, Instant Pots behave similarly from model to model. But if you have a different model, you may have to adapt the instructions slightly. If yours is the larger 8-quart model, you can either increase the ingredients by 1/3 or decrease the amount of water you add to the pot.
- You may have noticed the vegetables in this recipe are much smaller than those used in a traditional bone broth recipe. This is because the pressure cooker infuses the broth with the vegetable flavor. I found that if I added full sized vegetables, the flavor was too strong. Some people wait and add full-size vegetables during the last 30 minutes of cooking, but this requires depressurizing and re-pressurizing the Instant Pot. I’m all about “easy” cooking, and in my experiments this recipe achieves the same flavor without that extra step.
- Looking for more AIP Instant Pot recipes? Check out The Paleo AIP Instant Pot Cookbook.
- Prep Time: 40 minutes
- Cook Time: 2 hours
- Category: Healing Foods
- Method: Instant Pot
