
(Paleo, AIP, GAPS, Wahls, Whole30)

“The science and art of fermentation is, in fact, the basis of human culture….Culture begins at the farm, not in the opera house, and binds a people to a land and its artisans.”
~ Sandor Ellix Katz
Kombucha Series
If you haven’t read the first two posts in my Kombucha Series, check out Myths vs. Truths to dispel some common misconceptions and find out what kombucha can do for you. Then read Tips & Troubleshooting, to ensure your home brewing is a success. Now, for the final step: the recipes!
Recipe: The Basic Kombucha Elixir
Makes 1 gallon
Ingredients
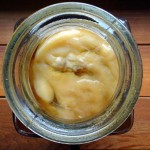
- 1 kombucha SCOBY
- Black, Green, White Tea or a combination of these (2 Tbsp. loose leaf or 6 teabags total)
- 1 cup brewed kombucha from a prior batch (otherwise known as starter tea)
- 1 cup of sugar (either refined white sugar, or organic evaporated cane juice)
Supplies
- Gallon glass jar
- A piece of tightly woven cloth
- Rubber band
- Stainless steel pot
- Long handled spoon
Directions
- Wash your jar with hot water, dish soap and a little bit of vinegar. Rinse well and set aside.
- Boil 1 quart of filtered water in a stainless steel pan. Remove from heat. Add your tea and steep for 10 minutes.
- Remove the teabags and add 1 cup of sugar. Stir until dissolved.
- Pour this sweet tea into your glass jar. Fill the rest of the way with cold filtered water, leaving a few inches of room at the top. Stir to blend and then test the temperature. It needs to be 85 degrees or lower before going onto the next step.
- Add the starter tea, and then with clean hands, place the SCOBY on top.
- Set your kombucha in a good location. You want the temperature to be between 72-85 degrees, out of direct sunlight, with good air flow – not in a cupboard. (You might need to use a heater to maintain the temperature. Seedling mats are an inexpensive option. Kombucha heaters are more expensive, but if you can afford it they do work better.)
- Cover the top of the jar with a piece of tightly woven cloth, secured with a rubber band.
- Sing it a little song, send it some loving vibes, tell it it’s beautiful, and then leave it be.
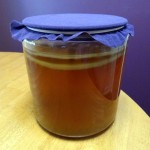
- In 7 days, start tasting your kombucha. You want it to be sour/tangy with a touch of sweet remaining. Alternatively, you can brew it longer until it is 100% sour, and then combine it with juice to drink. Just don’t brew it longer than 30 days. Generally, kombucha is “ready” somewhere between 7 and 21 days.
- When your kombucha is done, wash your hands and get a clean bowl. Put the SCOBY in the bowl, along with 1 cup of the kombucha (also known as starter tea). Ideally gather it from the top of the jar, because this is where the beneficial bacteria live. Beneficial yeast exist throughout the liquid, but are especially thick at the bottom of the jar. So, if you pull from the top, you’re getting both the good yeast and good bacteria, but if you pull from the bottom, you’re getting a yeast-dominant kombucha. You want your starter tea to be balanced.
- Once you’ve removed the SCOBY and starter tea, stir the remaining kombucha and pour it into a large pitcher and put it in the fridge. Or separate it into airtight containers for a second fermentation (described below). Or use some to make kombucha berry popsicles! Straining the kombucha is optional.
- To start your next batch of kombucha, go back to step 2 and repeat.
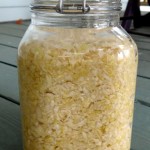
- Usually, a new baby SCOBY forms with every batch of kombucha, although when you first start brewing, it might take a few batches for this to happen. You can let your SCOBY grow up to 2 inches thick, but after that, you need to split it. Keep the healthiest looking SCOBY for your next brew.
Optional Second Step: Flavor Fermentation
This second step turns it into a healthy soda-pop with a little extra carbonation and sweetness. If you want actual soda bottles, you can buy these cuties through Amazon, but any airtight glass container will work, including mason jars and old (clean) jam jars. Here’s what you do:
The Steps
- Clean some airtight containers with dish soap, water and vinegar and rinse well.
- Add your flavors (see below)
- Pour fermented kombucha on top of the flavors and fill almost to the top, but leave an inch free for the carbonation that will develop.
- Put the caps on tightly and let them ferment at room temperature for 48-72 hours.
- Strain and refrigerate.
Flavor Ideas
- Add a few pieces of fresh or frozen fruit. Add any fruit you like: blueberries, blackberries, mangoes, pineapple, peaches, pears, apples, etc. You can add dried fruit as well, but fresh fruit gives a stronger flavor.
- Add a chunk of fresh ginger, for a ginger-ale flavor. You can chop or grate it for an even stronger flavor.
- Add 1-2 Tbsp. of fresh squeezed juice: orange, lemon, lime, grapefruit, cranberry, pomegranate….your options are endless.
- Add a small amount of whole spices: cinnamon stick, cloves, etc.
- Add 1 tsp. of dried herbs: lavender, chamomile, lemon balm, rosemary, etc.
- Feel free to combine these flavor ideas: pineapple ginger, apple cinnamon, lemon lavender, etc.
- Use your imagination and have fun. The amount of flavoring used depends on the size of your container and your personal taste. You can adjust these amounts up or down, as needed.
- For more flavor inspiration, check out The Big Book of Kombucha, which has over 200 flavor recipes in chapter 11.
A few things that can happen
- You know the sediment and brown strings that form in your gallon jar of kombucha (a completely normal sign of the presence of beneficial yeast)? Well, they are likely to form in your flavored concoction as well. And sometimes tiny SCOBYs form in the liquid like jellyfish, or at the top of your container. You strain the second fermentation before refrigeration, to remove the fruit or juice pulp, and these will be strained out at the same time.
- If you forget about your airtight flavor fermentations and leave them on the counter too long, they can explode. So, don’t do that! I couldn’t find any information on when this might happen. At the week mark? Earlier? Later? It probably depends on how hot your house is, and how carbonated your kombucha was when you started this step. You can put your flavor fermentations in a box, just to be on the safe side. You can also open them daily to release some of the pressure.
You May Also Be Interested In


Credit: image at top of page purchased from iStock.

Can I use decaf black tea?
Absolutely! When it comes to decaf teas, look for ones that are decaffeinated naturally using the CO2 method rather than chemical decaffeination. The good news is that kombucha doesn’t need caffeine to thrive.
I’m confused as to how this is AIP friendly if we use sugar to make it? Also if we drink Kombucha for health reasons how much should we drink a day? A shot glass size? 1 cup full? 5 cups full?
Hi Christina. 4-8 oz. is a medicinal amount. It’s easy to overdo kombucha – more than that and it’s just healthy soda pop. As for the sugar, fermented sugar is different from unfermented sugar. It’s easier to digest, and Sarah Ballantyne – leader of the AIP – believes the benefit of fermentation outweighs the negatives of the sugar, so long as you don’t over-consume. I have a glass with dinner nightly myself. Check out the rest of the kombucha series (linked at the bottom of this post) for more information on the whole process.
Perfect thank you 🙂 I’ve been making it for a few weeks now and I really enjoy the process of making it and drinking it but started to panic that it wasn’t ok on AIP. Thanks for putting me at ease
Ph question, I have been brewing now for 8 days and the Ph is around 4.0 -3.8. My understanding is it should be around 3.0 at around 7-10 days, does this mean that the batch is taking a little longer to complete? This is my first ever batch, smells just right with a little vinegary smell and tastes like sweet tea at the moment.
Thanks!
Hi Rob. Honestly, I never test Ph. I go by taste. Every batch will brew at different speeds based on room temperature and size of SCOBY. If yours still tastes like sweet tea, it’s not done yet. Give it another 1-3 days. It should be sour with a touch of sweet, rather than the other way around. Welcome to the kombucha community!
Thanks Eileen for these informative posts. I am being gifted a scoby today and plan to start my first batch right away. Wish me luck!
Happy Brewing, Margaret! I’m enjoying some Orange Cardamom kombucha right now. 🙂
if i were to buy a fresh mother scoby online,
could i just start a batch with only scoby,tea and sugar?
is brewed kombucha from a prior batch a key to success or just an aid to a successful brew?
Hi Adam. You absolutely need the starter tea. Otherwise your brew will develop mold and unhealthy bacteria – they’re drawn to the sugar and the starter tea provides protection against this. The good news is that if you buy your SCOBY from Kombucha Kamp, they include starter tea.
Hi! Is it okay to add flavorings after I already put the kombucha in the refrigerator? I have a lot and wanted to experiment. I can always wait until the next batch, but was just curious!
Absolutely, Mary Jo. Just take them out of the refrigerator and let the second fermentation happen at room temperature.
I want to flavor second ferment in one large batch (2 gal glass container), then strain & bottle to cut down on time.
Q1: Do I use an airtight cap? If yes, carbonation will occur, building pressure. Are there specific containers I should use so it doesn’t explode?
Q2: before bottling, do I stir contents to mix in yeast which gathers at bottom?
Hi Linda. You always want to use an airtight cap for the second fermentation. If you’re worried about too much pressure building up, just remove the cap to release the pressure and reseal once/day. As for your second question, stirring before bottling isn’t required but it does create a more balanced brew between bottles.
CAn I use decaf tea?
Hi Cedar. You can use decaf. I recommend buying a brand that has been decaffeinated by the CO2 method (a healthier choice, compared to the more common chemical decaffeination.)
You are a god/goddess-send. Respect from a new English fan! Advice please. I was given a baby a few weeks ago and enjoyed my first batch. I then made another which had a lot more of the yeast trails. My stomach revolted – huge cramps and I felt really full/bloated. Poisoned. Even pains in my back. Boooo. My enthusiasm is somewhat thwarted. I want to persevere but I’m scared! Have you heard of anyone else responding this way? Hands up I was slapdash when I made the second lot – not accurately measuring sugar or liquid. Maybe I’ve created a bit of a toxic brew? Eek. Can I use a bit of this if I let it brew longer to start a new fresh batch? Thank you for your wisdom and insight. Sonia
Hmmmm. Fermentation is science, so you do want to measure. Since you responded well to the first batch and poorly to the second, I recommend saving the SCOBY but tossing out the kombucha. Get some fresh kombucha starter tea from a friend and start over. We’ve all made mistakes, Sonia. Don’t feel badly!
Thankyou Konbucha oracle, will do. Meantime, have you heard of anyone else responding this way? It was quite alarming. Little did I know what putting too much sugar in would do. I’m guessing that’s what happened. Too much sugar – yeast – alarmed my system.
I’m brewing my first batch. I got my Scotty from @ kit purchased from “Thrive Market”. I followed all instructions & placed a coffee filter with a rubber band over the top. The instructions that came with the kit said to keep the cloth on top dampened with white vinegar. I tried think initially but it dried out so quickly I gave up. Also, I am keeping it on my kitchen counter (granite) in a dark corner. We keep our house at about 70 degrees. I had planned not to check it until about 30 days, but saw in an earlier post to start checking around day 7. Do you think it’ll come out ok? Any advice or suggestions?
Hmmmmm. It doesn’t sound like you got the best instructions from Thrive. I recommend a cotton cloth cover instead of a coffee filter. It’s more durable. Your house is a little too cool for brewing kombucha well. It might work, but the SCOBY will struggle a bit, and if the temperature drops into the 60’s it might “go to sleep” and stop brewing altogether. If you can afford a kombucha heater, I recommend buying one. An alternative is to put it on top of your fridge, which is often a warm spot in the kitchen. As for when to start checking, I recommend at around the 10 day mark. Brew time will vary based on SCOBY strength and temperature, and everyone has a different preference about when it’s “done.” I like it at around 2-3 weeks. By 30 days, it has often turned to vinegar.
I’ve been doing continuous brew in one gallon jar, and started a second brew another yesterday. The person who gave me the SCOBY for the second one was very generous. She gave me enough SCOBY’s to make both a second brew and a SCOBY hotel. She also gave me 4 cups starter instead of two. I decided on a whim to not make a hotel. Instead I distributed her SCOBY’s and additional starter in the two jars. I topped off both of them with sweet tea. Was that a mistake? In particular, what’s that going to do to the timing of my first brew, which was already in progress? Do I just track the tartness for both, and use it accordingly? Or did I accidentally speed up the brewing (and deplete the nutritional benefits) for both of them, because I added that extra starter and SCOBY?
You probably did speed up the brewing, but I don’t think that depletes any nutrition. Just watch it more closely so it doesn’t turn to vinegar accidentally. Then, I do recommend creating a SCOBY hotel. Most of us need a spare SCOBY eventually!
Thanks!
Thanks for your dedication, Eileen! I’m new to KT. Recieved a SCOBY from a friend with the required starter tea and just went for. it. I brewed a gallon of decaffinated sun tea, letting it cool on my counter for the afternoon. My starter batch is in a large glass gallon jar, with a metal lid that is not screwed all the way down. There is a metal spigot that is plastic on the interior of the jug. No metal comes into contact with the KT. I am using apple cider vinegar and regular sugar. Once my sun tea had cooled I added it all to the larger jug, added a good 1/4 cup of cider vinegar and about a cup of sugar. I gently stir with a wooden spoon until the sugar is desolved and there it sits for about a week. When done to taste I stir, open the spigot over my clean empty, sun tea jar, fill it and pop it in the fridge. I leave about 4 inches of starter. I am on my second batch. I usually drink about 12 oz during the day over ice and then another glass at dinner. So far, no noticable difference. I’m wondering….can I add lemonade to a single serving? Can I add a dozen sliced lemons to the refrigerated batch? Am I killing my SCOBY with the cider vinegar? ( I don’t think so as I have a nice sized baby on the mother right now.) Also, any results coming in on weight loss benefits??
Thanks much!!
Hi Casey. You’re not making kombucha. You’re making an apple cider vinegar hybrid. The SCOBY for ACV and Kombucha looks the same. I can’t advise you, because I have no idea what type of bacteria you’re brewing with this blend.
I am new at brewing Kombucha, but my grocery store tells me they hate to sell it because of the bottles exploding; they are told to triple bag it and wrap the bags around tightly. My local green grocer’s employees told me for the second brewing that they burp it daily!
GOOD INFO
With the changing of the seasons, room temperature can really affect the brew time of kombucha. Since I’m not starting any seeds this time of year, I wrap my electric seed mat around my 2 gallon brew jar and it keeps it nice and toasty. Fresh kombucha brewed in 9 days with a healthy baby SCOBY in tow. I don’t know how much electricity it uses, but it doesn’t overheat the brew and keeps it nice and bubbly. Enjoy!
I keep my booch sitting on a seed mat year-round, for just that reason, and even so, it usually takes 3 weeks to brew. Great tip to wrap it up to speed up the process! I’ve heard of people using twinkle lights the same way.
Great article! I just won an auction on eBay, and am getting 5 baby scobys- Should I use all 5 together in a gallon, or make quart batches with individual scobys?
Thanks!
Hi Dori. If I understand you correctly, you’re getting 5 quart size SCOBYs? If yes, you can use them together in 1 gallon jar. Once you’ve brewed a few batches, you’ll have a new gallon size SCOBY on the top of your jar, and your can compost or give away your smaller ones.
Hi Eileen! This is so informative! I’ve been paleo for 2 years but have had a flare up of my auto immune disease so I’m trying to try some new things to kick it in the butt- one of them being fermented things! Do you know if you can use honey instead of the sugar in kombucha? My system seems to react a lot better to honey. Thanks!
Unfortunately, you cannot. Kombucha needs sugar to thrive. Howevever, there’s another ferment called Jun that’s similar, and it thrives on honey and green tea. You just need to start with a jun culture, instead of a kombucha one. Here’s a link to more information. Happy fermenting!
Hi Sarah,
I am a newbie to Kombucha, but have many years experience of brewing. To ferment anything, sugar and yeast need to interact, it doesn’t need to be refined sugar from the supermarket, it can be sugar from fruit or vegetables.
HOWEVER, all my reading about Kombucha tells me not to use the SCOBY directly with fruit or vegetable juices, as over time it will weaken the SCOBY, so I add my carrot and beetroot juice after initial fermentation. Now I don’t know if using a SCOBY with fruit or vegetable juices does affect the SCOBY, but that is certainly the conventional wisdom you will find on the internet.
So if you want to avoid refined sugar entirely, then you should avoid Kombucha and use other fermented foods as Eileen suggests.
One thought for you, is that the longer you allow the Kombucha to ferment, the lower the final sugar content will be, BUT the higher the alcohol content will be, not that it will be high, I believe <1%.
And the same will be true of any fermented food, it will contain calories from it's alcohol content.
So if you are concerned about the sweetness of Kombucha, ferment it longer, I typically use 10 days, then bottle with mint and ginger, but you could ferment 20+ days.
If you are concerned about calories, you cannot avoid them, you get the same from sweetness or alcoholic content.
This is probably a dumb question, but I don’t want to consume sugar. AND isn’t it part of the diet plan on your site…? Not to consume sugar. Is there an alternative to this?
Hi Sarah. Fermented beverages are different and fully embraced on all the healing diets featured on this site, so long as your body responds well to them. They are medicinal, so portions are meant to be small: 2-8 ounces daily. That said, if you want to avoid sugar in all forms, choose fermented vegetables instead, like sauerkraut. Here’s a recipe.
I am a total newbie to Kombucha. Made my first batch which is in secondary fermentation. One bottle has fruit juice added which will provide the sugars needed. The others I bottled as plain tea, the tea tasted ‘flat’ ie fermented out before bottling, so I added 1/3 teaspoon of sugar to each bottle, hoping this will provide the ‘fizz’. I haven’t seen anyone comment on adding sugar to plain Kombucha, so I would value your views.
I’m biased toward natural sugars, so I’ve always added fruit or juice for the second fermentation, and they work well. The second part of that equation is time. If you want a fizzier drink, let it ferment on the counter longer than 2 days. To be safe, but your bottles in a box, just in case they explode. That sounds scary, I know. It rarely happens, but it is always a possibility with longer fermentations. Some other things to know: (1) It often takes a few batches of kombucha before the fizz starts to build; it’s a result of a more mature SCOBY. (2) Green tea produces more carbonation than black, I’m told. (3) You’ll never have the carbonation level of storebought kombucha. They actually carbonate the drink like soda, giving a false level of fizz. Natural fermentation fizz is more subtle. Congratulations on your first batch, though. I hope you enjoy it!
I always add organic raisins or even prunes to my fruit/flavorings for second ferment. This speeds up process and creates a no-fail effervescence! Second ferment is usually no more than 24 hours!
Great tip, Kim. Thanks!
Hey Eileen,
I have a question for you. I brought my six crocks of kombucha upstairs into my kitchen. They are exposed to noises such as the vita mix and the almost constant whirring sound of the dehydrater, not to mention the sound of kids, tv, music, etc. I also move the crocks around quite often. Is this good for the scobies/kombucha? I mean will it make a difference in taste, quality, longevity…? Thank you so much!
Carnette
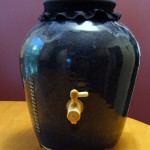
SCOBY’s are pretty tough; I don’t think they’ll be harmed by noise. Moving them around can slow down the fermentation process and prevent new SCOBY’s from forming, so it’s best if you can find a spot for them where you don’t move them too often. Have you ever tried continuous brewing? It’s a way to brew a lot of kombucha at once, with less work and less counter space. They’re usually 2-1/2 gallon brewing containers that people can set on top of the fridge (out of the way and then they get the bonus of a warm space to brew). I haven’t tried it yet myself, but I hear good things about it.
Update! I just remembered you told me before that your crocks ARE continuous brew. So, that answers my question. You’ve got a mini kombucha factory going on. Impressive!
Thank you so much Eileen! I will try to store my crocks on top of the fridge. You are awesome!! 🙂
Hi Eileen I was wondering if you have ever done Coffee kombucha and if yes could you give me some tips.I have tried it but the information I had did not mention about having a spare since the scoby used for the coffee kombucha should not be used a gain.So now have to purchase a new scoby ,chock one up for making a mistake and learning it the first time.Thanks Karen
I don’t recommend brewing kombucha with coffee, because the SCOBY needs tea to thrive. If you want to give it a little coffee flavor in the second fermentation, follow the recipe for flavoring kombucha above and use a few coffee beans.
A friend of mine made coffee booch and it was really good! Here’s awebsite that might help. pttp://www.culturesforhealth.com/kombucha-coffee-recipe/
Am I crazy? I’ve been using 6 tsp of tea (3 tablespoons) in my 1 gallon sweet tea recipe (1 cup of sugar). Any ideas on what that strong a tea would do pro/con? Tempted to try less tea and see. My brews are great and strong but also strong flavored.
Hi Craig. I don’t think the stronger tea is hurting anything; it’s just not necessary. I’m sure it’s contributing to the strong flavor, so you might like the taste better with the traditional 2 Tbsp.
Thank you so much Eileen! You are a gem! I am in Colorado Springs. If you ever need any help in this neck of the woods, or want to expand and need some leg work done. Just let me know. Thanks for your graciousness and unselfishness! 🙂
Hi, does anyone know if it is alright to do a second fermentation of kombucha in a gallon jar? I make a lot of kombucha at a time and it would be so much easier if I could just second ferment a whole gallon and then bottle it.
Absolutely you can. Just up the flavor ingredients accordingly, and be sure and clean the jar thoroughly afterward, before brewing your next batch.
Wow, thank you so much Eileen for your quick response to my question. I am in the process of doing a second ferment now, so I am very excited to know this. Now I can save so much time! Thank you so much!
You’re welcome. Don’t forget to remove the SCOBY before you add your flavors, along with some brewed kombucha to start your next batch. The reason people do the second ferment in smaller jars is to protect the SCOBY.
Thanks, I have six 2.5 gallon crocks of continuous brew kombucha, so when I am ready to do the second ferment, I just draw the kombucha from the spigited crock into gallon sized jars that have the flavorings in them and then let those gallon jars ferment for a day or two. This way the scoby is not disturbed. Does this sound ok?
What can be done with the fruit that is left over from the second ferment after it has been strained out? Thank you so much!
That sounds perfect. As for the fruit, I usually just compost mine, but you could eat it. If the flavor’s too strong, try adding it to a smoothie.
when making my second batch ,there is a baby forming on top .Do I transfer the baby or wait untill the baby is bigger before starting the second batch?
If you’re talking about the big batch of kombucha (gallon size), I let the babies pile up and don’t separate them until they get over an inch thick. I think that makes a stronger brew. The only reason to separate sooner is if you have a friend who wants a SCOBY. If you’re talking about the second fermentation with flavors, it’s normal for a tiny baby to grow in those smaller jars, too. I just throw it away at the same time I strain the flavors out.
I just made my 1st batch of Kombucha! and already have a baby scoby… how do i add a photo so you can let me know if you clean the scoby’s at any time (many pics I’ve seen ppl post were just white scoby w/o the brown stuff).
Hi Maria. The brown stuff is the beneficial yeast. Don’t try to clean the SCOBY. It’s not necessary, and the water you use could add something harmful to your brew (like chlorine or bacteria in your tap water). Congratulations on your first batch!
Hi, I have a really thick healthy looking scoby that has formed on my second ferment ginger and lemon Kombucha. It seems a shame to throw it away. Can I put it with my other scobies in my scoby hotel and if i can, do I need to rinse it first?
Thanks
Kat
Sorry for the delayed reply, Kat. I was on vacation and had no internet access. It’s a good question, but I actually don’t know the answer! I would be reluctant to add it to the SCOBY hotel, in case the flavoring affects the other SCOBYs, but it might be fun to go ahead and use it on your next fresh batch of kombucha as a test, to see how it does.
I am definitely going to try new flavors in my kombucha, I always do the plain regular. Thanks again for sharing on Wildcrafting Wednesday!
Awesome kombucha post! Clear instructions & I love the idea of flavoring it! Yum! Thanks for sharing at Well Fed Wednesday! 🙂
I love these ideas they look amazing! I just spent a very cold winter in a little house with an outdoor kitchen and sadly all my SCOBY’s died in the cold. I would like to get it started again as its almost becoming warm enough for them to survive! Do you ever make water kefir? I was making it for a few months before winter but the cold killed those off too. And do you have any recommendations for the best place that I can order a kombucha SCOBY? Thanks for the great info I am going to subscribe!
Hi Kayleigh. Check out my Tips & Troubleshooting Post. The first section gives you some good sources for a SCOBY. I haven’t made water kefir, but I did make raw goats milk kefir last summer. The milk goes out of season in the winter, which is what made me switch to kombucha. The beauty of kefir is its speed. Kombucha requires patience. I love them all, though! I just started my first batch of homemade sauerkraut. If it goes well, I’ll write a how-to post on that as well.
I love kombucha, but have never made it. Honestly, the scoby scares me! But, it doesn’t seem too difficult. I love the bottles that you have!
It is freaky looking, isn’t it? But you’re absolutely right that it’s easy to make, and it’s sooooooo much cheaper AND more beneficial than storebought brands, most of which are pasteurized. I hope you give it a try. It’s actually kinda fun.
My yeast strings have turned black Why?
Jayne, I can’t tell you why, but I can tell you that’s a bad sign. I recommend starting over with a new SCOBY and new starter tea.
Great post! I love all the flavor ideas–I really like mine plain, but think I want to try a bit of vanilla extract. As for the explosions-I don’t think time is as big of factor as sugar content and possibly temperature. That is just based on my experience and not science. I’ve had mine bottled at room temp & been fine for over a week-still fizzy, but one I brought to work spewed all over when I opened it (bottle didn’t explode but prob close) and remembered I had used more sugar and initial ferment only a week. I think the more sugar, the more CO2 it can product. You can always “burp” them occasionally to check the pressure buildup.
I like it plain too and just started experimenting with flavor. I must admit, I LOVE lemon ginger. Thanks for your insight on the “explosions”. May we all avoid that!